Your car’s brakes are your most important safety feature, yet many drivers wait for a scary noise or a warning light before giving them any attention. By then, a simple fix may have snowballed into a costly repair. The good news is, you don’t have to be a master mechanic to keep an eye on your brake health.
A simple DIY visual inspection can empower you to spot the early signs of trouble, particularly uneven brake pad wear, long before it becomes a serious safety hazard. Performing this check every six months or during a seasonal tire swap can save you hundreds of dollars and give you invaluable peace of mind. This step-by-step guide will show you exactly what to look for, no advanced skills required.
Step 1: Safety First & Gathering Your Tools
Before you even touch a lug nut, safety is paramount. Never compromise on this step.
- Secure the Vehicle: Park your car on a flat, level surface like a garage floor or level driveway. Engage the parking brake firmly and place wheel chocks behind the wheels on the opposite end of the car from where you are working.
- Gather Your Tools: You won’t need a full mechanic’s toolbox for a visual inspection. All you need are:
- A car jack
- Jack stands (Never work on a car supported only by a jack)
- A lug wrench to remove the wheel
- A bright flashlight
- A small, angled mechanic’s mirror (optional, but very helpful)
- A ruler or a dedicated brake pad measuring tool
Step 2: Accessing and Inspecting the Brakes
With your car secure, you’re ready to get a clear view of the brake components.
- Loosen the Lug Nuts: Before jacking up the car, use your lug wrench to slightly loosen the lug nuts on the wheel you’re inspecting. Just a quarter-turn is enough to break them free.
- Lift and Support the Vehicle: Place the jack on your vehicle’s designated jack point and lift it until the wheel is off the ground. Immediately slide a jack stand into place under a strong part of the vehicle’s frame or subframe, then lower the car gently onto the stand.
- Remove the Wheel: With the car securely supported, finish unscrewing the lug nuts and remove the wheel. This will give you a wide-open view of the brake caliper, brake pad assembly, and the rotor.
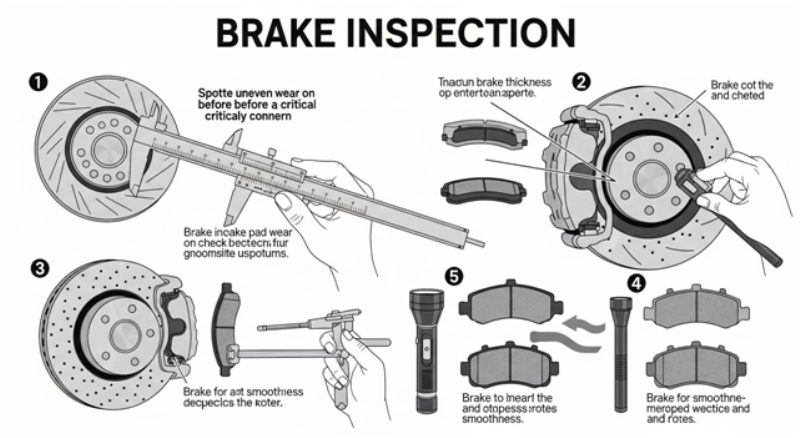
Step 3: The Search for Uneven Wear
This is the most critical part of the inspection. Use your flashlight to get a clear look inside the brake caliper.
- Check Overall Pad Thickness: Look through the opening (the “window”) on the front of the caliper. You will see the metal backing plate of the brake pad pressed against the brake rotor (the large metal disc). The friction material is sandwiched between them. As a general rule, if the friction material is thinner than the metal backing plate (less than 4 millimeters), it’s time to plan for a replacement. If it’s down to 2−3 mm, the replacement is urgent.
- Compare the Inner and Outer Pads: Now, look closely at the thickness of the outboard (outer) pad versus the inboard (inner) pad. The inboard pad can be harder to see, but this is where your mirror comes in handy. Are they the same thickness? If the inner pad is significantly thinner than the outer one (or vice-versa), you have found a classic sign of uneven wear. This almost always points to seized caliper slide pins preventing the caliper from applying even pressure.
- Look for Tapered Wear: Examine a single brake pad from top to bottom. Does it have a uniform thickness, or is it worn into a wedge shape? Tapered wear, where one end of the pad is thinner than the other, indicates that the caliper is misaligned or that the mounting hardware is worn, causing it to apply pressure at an angle.
Step 4: Inspect the Supporting Cast
While you’re there, take a quick look at the other components.
- Rotor Surface: Is the face of the rotor smooth and shiny? Deep grooves, scoring, or a pronounced “lip” of rust on the outer edge can indicate problems. A perfectly even wear pattern leaves a smooth surface.
- Brake Hose and Caliper Boot: Visually inspect the rubber brake hose for any cracks, swelling, or leaks. Check the large rubber boot around the caliper piston for any tears, which could let in dirt and moisture.
By following these steps, you can confidently assess the health of your brakes. If you discover a significant difference in pad thickness or tapered wear, you’ve caught a problem early. Now you can consult a mechanic with specific, valuable information, saving on diagnostic time and preventing further damage. To understand what causes these issues in the first place, it’s helpful to read about what causes brake pads to wear unevenly.